BOOK A VIRTUAL FITTING

And find your perfect bra fit!

BOOK A VIRTUAL FITTING

And find your perfect bra fit!
BOOK NOW
BOOK NOW

Find Your Size

Step 1: Measure for Band Size

Using a tape measure, measure your underbust. Make sure the tape is parallel with the ground, and you’ve exhaled to get the smallest measurement possible.

Step 2: Measure for Cup Size

Stand straight with your arms at your sides and measure at the fullest part of your bust (while wearing a non-padded bra). Make sure the measuring tape is parallel with the ground and not binding. The difference between the measurement in Step 1 and the measurement in Step 2 is your cup size.

Understanding Bra Sizes and Sister Sizes

There’s a misconception that all cup sizes are created equal when in reality they’re not. Sister sizes are alternate bra sizes where the cup volume remains the same regardless of the band size and cup letter. For example, a 32D and a 38A are technically the same size because the cup volume is the same. However, 32D and 38D are not equivalent sizes. Sister sizes are meant to help you find your correct bra size. If you’re wearing the wrong size you can just decrease the band size and increase the cup size or vice versa to find the bra that fits your body.

Look at the chart below where each row shows you the sister sizes. You can use this to find your perfect fit:

  • If you try on a bra and the cup fit is not right, try a size above or below the current size – in other words the band size stays the same, but you try on different cup sizes.
  • If you try on a bra and the band size is not right, try a size to left or right of the current size – in other words the cup size stays the same (even if the letter changes), but you try on different band sizes.

In the same band size:

Bust letter increases as cup volume increases.

Band size affects bust size:

Every C cup is different – if the band size increases, so does the cup size.

Sister sizes:

These bras have the same cup volume, but as band size increases, the bust letter decrease.

Your Unique Shape

Full at the bottom & shallow on top:

This bust type is fuller on the bottom than at the top.

Long and hanging:

Lace balconette styles will help you accentuate and make the most of your shape.

For these shapes we recommend:

Different size bust:

Most women have one breast bigger than the other. You should always fit a bra to the bigger breast, then tighten the strap on your smaller side.

Full bust:

Very full bust with a tendency for East / West pointing nipples.

For these shapes we recommend:

Naturally firm and full:

Overall a fuller bust which is perky and firm.

Rounded:

A firm, rounded and full bust or for those who are breast enhanced. Also ideal for small & firm breasts.

For these shapes we recommend:

Heavy and fleshy:

For a heavy, fleshy bust which needs to be scooped up and supported, giving it a lifted, rounded shape.

Wide apart:

A full bust with a full, heavy bottom which needs to be scooped up and brought together, giving a lovely cleavage.

For these shapes we recommend:


Bra Fitting Tips

How to fit your bra correctly

  • STEP 1: Fasten the band around your body onto the loosest hook and eye. If you have difficulty reaching the back then just fasten the bra at the front and turn it around. The band must be level all the way around without riding up at the back.
  • STEP 2: Place the straps on the shoulders, making sure that they are flat and sitting parallel to each other. They should not dig into the shoulders.
  • STEP 3: Hold the base of the underwire and scoop your breasts into the cups. This gets the fullest part of the breast into the bra and makes sure there’s no breast tissue getting pinched by the wires.
  • STEP 4: Adjust the straps. Remember that the band provides most of the support, not the straps, so they should feel firm but comfortable. You will only need to complete this step when you put on a new bra for the first time.

When the fit is right

THE BAND:
Put two fingers from both hands under the band – it should be nice and firm around you for support. 80% of the weight of your breasts is held in the band, so it’s really important the fit is firm. If you can fit more fingers under the band, it is too loose.

REMEMBER: If your bra is brand new, it will stretch out over time.
If the band is too loose, try the band size down.If the band is too tight, go a band size UP and a cup size DOWN to get the most similar fit – remember those sister sizes!

ADJUSTING THE STRAPS:
If the straps slide off your shoulders, tighten them until they feel comfortable and snug. Do not tighten them too much – you don’t want them to dig in! You should be able to pull the straps up off your shoulders no more than 5 cm.

LOOK AT THE WIRES OF THE BRA:
Run your fingers from the centre of the bra, along the wires to under your armpits. The wires and centre front must sit flat against the body. There should be no gap between the centre front and your body, and the wires should not dig into your body.

MOST IMPORTANTLY:
Is the bra comfortable? It shouldn’t hurt you anywhere and you should feel secure, supported and in love with your silhouette.

What to do if the fit is wrong

IF THE BACK RIDES UP:
The band is too wide. Go down a band size and try the band test by placing two fingers of both hands under the band and testing the firmness.

IF THE CUPS GAPE AND WRINKLE:
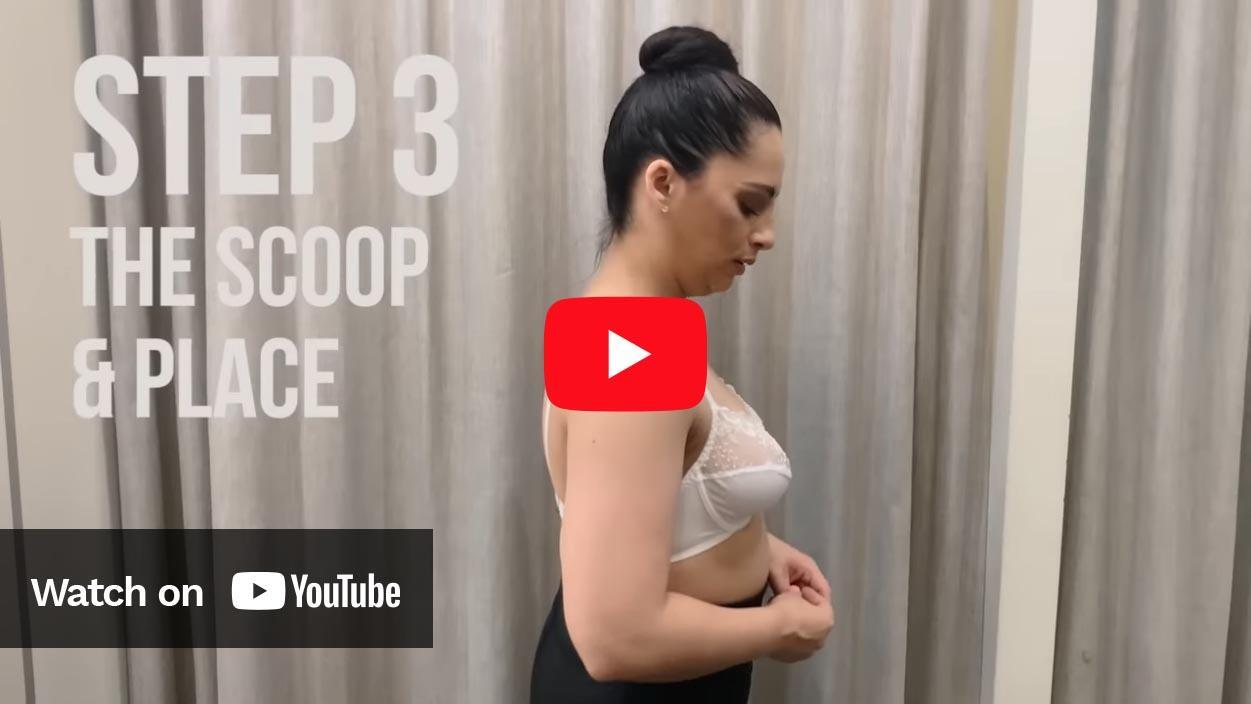
The cups are too big. First, try scooping your breasts into the cups – if the cups are still wrinkling, try a cup size down.

IF YOUR BREASTS SPILL OVER THE CUPS:
Or your bra gives you a ‘four-boob’ effect. The cups are too small. Go up a cup size and test the band for firmness too.

POKING AND CHAFING:
If you experience any uncomfortable poking, chafing and parts of the bra are sore on your skin. Chafing usually means the bra is too loose and is able to move around too much. Try a band size down and test the band for firmness as above.